Physical Address
304 North Cardinal St.
Dorchester Center, MA 02124
Physical Address
304 North Cardinal St.
Dorchester Center, MA 02124
Are you looking to install WordPress on localhost but unsure where to start? This comprehensive guide will walk you through the entire process, from understanding what localhost is to successfully setting up WordPress on your local machine. Whether you’re a beginner or an experienced developer, this step-by-step tutorial will help you create a local WordPress environment for testing, development, or learning purposes. By the end of this guide, you’ll have a fully functional WordPress site running on your computer. Let’s dive in!
Setting up WordPress on localhost is an essential skill for anyone working with WordPress. It allows you to experiment with themes, plugins, and custom code without affecting a live website. Additionally, it provides a safe environment for testing updates and troubleshooting issues. In this guide, we’ll cover everything you need to know, including how to use tools like XAMPP and WAMP, install WordPress themes, and configure your local server. Ready to get started? Let’s begin with the basics.
Localhost refers to your own computer, which acts as a local server. When you install WordPress on localhost, you’re essentially creating a WordPress website that runs on your machine rather than a live web server. This setup is ideal for developers, designers, and WordPress enthusiasts who want to build and test websites offline.
There are several advantages to installing WordPress locally. First, it provides a risk-free environment for testing new themes, plugins, or custom code. You can experiment without worrying about breaking a live site. Second, it’s faster than working on a remote server because everything runs on your local machine. Finally, it’s cost-effective since you don’t need to pay for hosting or domain names during the development phase. Whether you’re building a new website or learning WordPress, localhost is an invaluable tool.
XAMPP is one of the most popular tools for setting up a local server environment. It’s free, easy to use, and compatible with Windows, macOS, and Linux. Here’s how to install WordPress on localhost using XAMPP:
First, download the latest version of XAMPP from the official website. Once the download is complete, run the installer and follow the on-screen instructions. Make sure to select the components you need, such as Apache, MySQL, and PHP. These are essential for running WordPress locally.
After installing XAMPP, open the XAMPP Control Panel and start the Apache and MySQL services. These services are required to run WordPress on your local machine. If everything is set up correctly, you should see green indicators next to both services.
Next, download the latest version of WordPress from the official website. Extract the WordPress files and place them in the htdocs folder inside your XAMPP installation directory. Rename the folder to something meaningful, like mywordpress.
Open your browser and go to http://localhost/phpmyadmin. This is the interface for managing MySQL databases. Click on the “Databases” tab, enter a name for your database, and click “Create.” Remember the database name, as you’ll need it during the WordPress installation.
Navigate to http://localhost/mywordpress in your browser. You’ll be greeted by the WordPress setup wizard. Select your language and click “Continue.” On the next screen, enter the database name, username (usually “root”) , and leave the password field blank. Click “Submit” and then “Run the installation.” Follow the prompts to complete the installation.
WAMP is another popular tool for creating a local server environment, especially for Windows users. The process of installing WordPress on localhost using WAMP is similar to XAMPP but with a few differences. Here’s how to do it:
Download the latest version of WAMP from the official website and run the installer. Follow the on-screen instructions to complete the installation. Once installed, launch the WAMP server and ensure that both Apache and MySQL services are running.
Download WordPress from the official website and extract the files. Copy the extracted folder to the www directory inside your WAMP installation folder. Rename the folder to something meaningful, like mywordpress.
Open your browser and go to http://localhost/phpmyadmin. Click on the “Databases” tab, enter a name for your database, and click “Create.” Remember the database name for the WordPress installation.
Navigate to http://localhost/mywordpress in your browser. Follow the WordPress setup wizard, enter the database details, and complete the installation. Once done, you’ll have a fully functional WordPress site running on your local machine.

Once you’ve installed WordPress on localhost, the next step is to install a theme. Themes control the appearance of your website, and there are thousands of free and premium options available. Here’s how to install a WordPress theme on localhost:
Choose a theme from the official WordPress theme directory or a third-party marketplace. Download the theme file to your computer. It will usually be in a .zip format.
Log in to your WordPress dashboard and go to Appearance > Themes. Click “Add New” and then “Upload Theme.” Select the theme file you downloaded and click “Install Now.” Once the installation is complete, click “Activate” to apply the theme to your site.
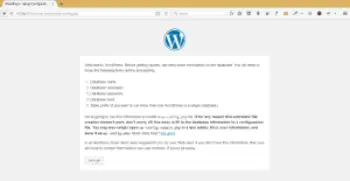
Installing a WordPress theme on localhost using XAMPP follows the same steps as above. The only difference is that you’re working in a local environment. After activating the theme, you can customize it using the WordPress Customizer or theme settings. This allows you to preview changes in real-time without affecting a live website.
Summary
Installing WordPress on localhost is a straightforward process that offers numerous benefits for developers, designers, and WordPress enthusiasts. By using tools like XAMPP or WAMP, you can create a local server environment and set up WordPress in just a few steps. Once installed, you can experiment with themes, plugins, and custom code without any risk. Whether you’re building a new website or learning WordPress, localhost is an essential tool in your toolkit. Follow this guide, and you’ll have a fully functional WordPress site running on your local machine in no time!