
What is a Media Library?
In WordPress, media refers to any type of non-text content that is used to create and enhance website content. It encompasses a wide range of file formats, including images, videos, audio files, documents, and even other types of digital assets.
Types of Media in WordPress:
Images: Images are the most commonly used type of media in WordPress. They can be used to add visual appeal to blog posts, pages, and other website elements. Images can also be used to convey information in a clear and concise way.
Videos: Videos are a great way to add interactivity and engagement to your WordPress website. They can be used to teach, entertain, or simply provide information in a more engaging way than text alone.
Audio Files: Audio files can be used to add a more personal touch to your website. They can be used to add background music, provide voiceover narration for videos, or even create podcasts.
Documents: Documents such as PDFs, Word documents, and spreadsheets can be uploaded and stored in the WordPress Media Library. This makes it easy to share documents with your visitors or to embed them directly on your website.
Managing Media in WordPress:
WordPress comes with a built-in media library that allows you to easily upload, manage, and organize your media files. The media library is organized by date and type, and it allows you to preview, edit, and delete your files.
Benefits of Using Media in WordPress:
- Visual Appeal: Media can add a lot of visual appeal to your WordPress website. This can help to make your website more attractive and engaging to visitors.
- Informational Content: Media can be used to convey information in a more engaging way than text alone. For example, you can use images to illustrate your points, or you can use videos to teach or demonstrate something.
- Interactive Elements: Media can add interactivity to your WordPress website. For example, you can use videos to create interactive tutorials, or you can use audio files to create podcasts.
- SEO Enhancement: Media can help to improve your website’s SEO. This is because search engines use images and videos to index your website.
Using Media Effectively in WordPress:
- Use high-quality images: Images are a crucial part of any website, so it’s important to use images that are high-quality and relevant to your content.
- Optimize images for SEO: Use filenames that include keywords, and add alt text to all of your images. This will help search engines to understand what your images are about.
- Keep images and videos sizes small: Large images and videos can slow down your website. It’s important to compress your images and videos so that they are as small as possible without compromising quality.
- Use media shortcodes: WordPress comes with a number of media shortcodes that make it easy to embed media files into your posts and pages. For example, you can use the shortcode to embed videos, and you can use the shortcode to create galleries of images.

how to add media in wordpress
How do I add a media folder in WordPress?
Adding media to WordPress is a crucial process for enhancing the visual appeal, engagement, and overall user experience of your website. With a few simple steps, you can seamlessly incorporate various media formats, including images, videos, audio files, and documents, into your WordPress pages and posts.
Steps to Add Media to WordPress:
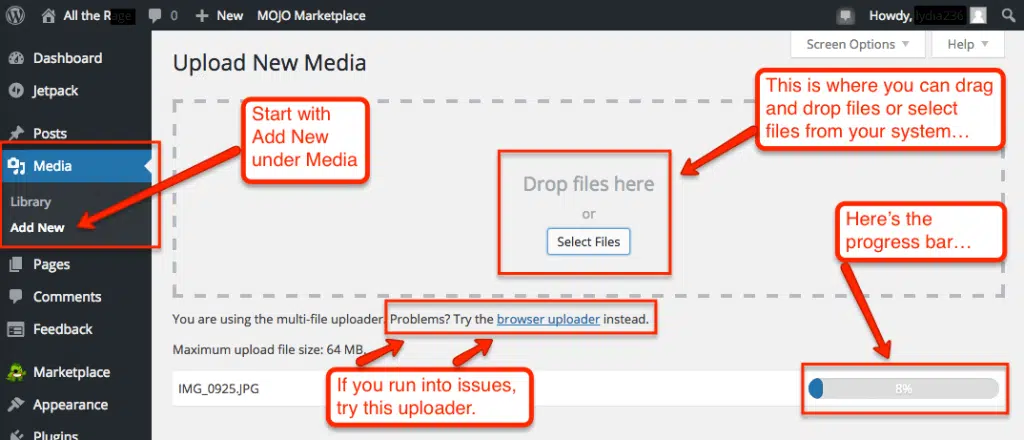
- Access the Media Library: Begin by navigating to your WordPress dashboard. On the left-hand sidebar menu, locate the “Media” tab and click on it. This will open the WordPress Media Library, where you’ll manage all your uploaded media files.
- Upload Media Files: In the Media Library, click on the “Add New” button in the top-right corner. This will initiate a pop-up window where you can select the media files you want to upload. You have two options: a. Drag and Drop: Simply drag and drop the media files directly onto the pop-up window. b. Select Files: Click on the “Select Files” button and browse your computer to locate the files you want to upload.
Optimize Images for SEO (Optional): Once you’ve selected the media files, click on the “Upload Files” button to initiate the upload process. Once uploaded, images can be further optimized for search engine visibility. This involves providing descriptive filenames and adding alt text to each image. Descriptive filenames and alt text help search engines understand the content of your images and improve your website’s ranking in image search results.
Insert Media into Posts or Pages: To incorporate media into your blog posts or website pages, open the post or page you want to edit. In the toolbar, locate the “Add Media” button and click on it. The Media Library will open, allowing you to select the media file you want to insert. Once selected, you can choose how you want the media to be displayed. Options include standalone images, galleries, and embedded videos.
Insert Media into Posts or Pages: To incorporate media into your blog posts or website pages, open the post or page you want to edit. In the toolbar, locate the “Add Media” button and click on it. The Media Library will open, allowing you to select the media file you want to insert. Once selected, you can choose how you want the media to be displayed. Options include standalone images, galleries, and embedded videos.
Edit Media Files: You can also directly edit your media files from the Media Library. This allows you to rename, delete, or crop images, and adjust the playback settings for videos.
Remember:
- Optimize media files for size to maintain website performance.
- Use clear and descriptive filenames and alt text for images to enhance SEO.
- Embed videos with appropriate settings to ensure optimal viewing experience.
- Utilize various media formats to create a visually appealing and engaging website.
